How to Replace a Garbage Disposal Under Your Sink
To replace a garbage disposal, shut off power, disconnect the drain and electrical connections, remove the old unit, then mount and connect a compatible replacement. Follow the new unit’s instructions, and call a qualified plumber or electrician if the wiring, mounting or drain setup is unfamiliar.
On this page (8 sections)
- What should you check before replacing a garbage disposal?
- What tools and parts do you need?
- How do you disconnect the old disposal safely?
- How do you install the replacement disposal?
- How do you reconnect power?
- How do you test a new garbage disposal for leaks?
- What should you do if the replacement does not fit?
- How do you choose the right replacement?
To replace a garbage disposal, shut off power, disconnect the old unit, install a compatible replacement and check every drain connection for leaks. Read the replacement’s instructions first, since mounting systems and electrical connections can differ.
A disposal is heavy and sits below the sink, so support it while loosening the mount. If you find damaged wiring, an unfamiliar hardwired connection or a mount you cannot secure, stop and contact a qualified electrician or plumber.
If you only need the removal steps, see our guide on how to remove a garbage disposal. For help choosing a replacement before you start, use the garbage disposal buying guide.
What should you check before replacing a garbage disposal?
Confirm the replacement fits your sink mount, drain outlet and available cabinet space before disconnecting the old unit. Also check whether the new disposal is corded or hardwired, and whether your outlet or wiring matches its instructions.
Look under the sink and note how the unit is mounted, where the discharge elbow connects and how the power is supplied. Take a photo of the drain and wiring arrangement for reference, but never rely on a photo instead of the installation instructions.
Check the replacement’s dimensions against the cabinet. The InSinkErator Badger 5 with Power Cord measures 6.31 x 6.31 x 11.5 in, which can help you compare its size with the space under your sink.
The Badger 5 is a 1/2 HP continuous-feed disposal. InSinkErator describes it as a compact model designed to fit existing InSinkErator hardware, but confirm that your sink’s mount is compatible before relying on a direct swap.
A new disposal may need a different drain elbow or other drain parts. The PF WaterWorks Disposal Installation Kit includes tailpieces, a drain arm, a tee, an elbow, a wall drain trap and washers; compare those parts with your existing setup before using it.
What tools and parts do you need?
Gather the new disposal, a bucket, towels and the tools named in its instructions before you begin. You may also need compatible drain parts, a screwdriver and a wrench, depending on the mount and plumbing.
Keep a bucket under the drain connections to catch water. Have a helper nearby if you need someone to support the unit while you loosen or fit it.
A corded replacement can plug into a suitable outlet, while a hardwired setup needs the correct electrical connection. The InSinkErator 3-Foot Power Cord Kit includes a cord, strain relief clamp, wire connectors and instructions for compatible disposals.
Check the compatibility information and local electrical requirements before installing a cord kit. For more context on corded and hardwired setups, read whether a garbage disposal needs its own circuit.
How do you disconnect the old disposal safely?
Switch off the disposal’s circuit at the breaker before touching its wiring or removing it. If it has a plug, unplug it after confirming the power is off; if it is hardwired, disconnect it only if you can identify and handle the wiring safely.
- Turn off the circuit breaker that serves the disposal.
- If the unit has a plug, unplug it and keep the cord clear of water.
- Place a bucket below the drain connections.
- Disconnect the dishwasher drain hose, if one is connected.
- Loosen the drain elbow screws and separate the elbow from the disposal.
- Support the unit while releasing its mounting ring or fasteners.
- Lower the old disposal carefully.
The disposal can be awkward to hold under a sink. Do not loosen the last mounting connection until you have a firm grip on the unit or help supporting it.
If you cannot confidently identify the correct breaker or wiring, leave the unit in place and get help. For related electrical questions, see our guide to garbage disposal wiring and circuit needs.
How do you install the replacement disposal?
Install the replacement by securing its mounting assembly, raising the unit into place and connecting the drain and power according to its instructions. Keep the power off until all connections are complete and the area is dry.
The exact mounting steps depend on the disposal. Some replacements can use an existing compatible mount; others need a new sink flange and mounting assembly.
- Compare the new unit’s mount and outlet with the old arrangement.
- Fit or reuse the mounting parts as directed by the new unit’s instructions.
- If replacing the sink flange, clean the sink opening and install the new flange and gasket as instructed.
- Lift the disposal into the mount and secure it fully.
- Connect the drain elbow and align it with the drain pipe.
- Reconnect the dishwasher hose if the setup uses one.
- Complete the cord or hardwired connection using the unit’s instructions.
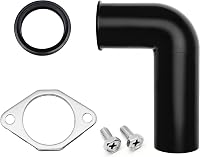
The drain elbow connects the disposal outlet to the drainpipe. If yours is cracked, missing or incompatible with the new unit, the Disposal Drain Elbow Replacement Kit includes a 1.5 in elbow, flange, gasket and two screws.
Do not force a pipe into alignment or use a drain part that does not fit. If the new outlet sits at a different height or angle, adjust the plumbing with compatible parts or ask a plumber to make the connection.
How do you reconnect power?
Reconnect power only after the disposal is mounted and the drain connections are secure. Follow the supplied instructions for the unit’s corded or hardwired configuration, and ask an electrician to handle wiring you are unsure about.
For a corded unit, route the cord so it stays dry and does not interfere with storage or plumbing. For a hardwired unit, use the correct cable connections and secure the wiring compartment as directed.
Do not energize the disposal with exposed wires, a loose mount or a wet electrical connection. If your replacement needs a cord but does not include one, check that the cord kit is compatible before installation.
How do you test a new garbage disposal for leaks?
Run water and inspect the connections before using the disposal for food scraps. Check the sink flange, discharge elbow and drain joints while water flows, then test the unit briefly if everything stays dry.
- Make sure the sink and cabinet area are dry.
- Restore power at the breaker.
- Run cold water into the sink.
- Watch the flange, elbow and drain joints for drips.
- If no leak appears, switch on the disposal briefly while water continues to flow.
- Switch it off and inspect the connections again.
If you find a leak, switch off power and stop the water before adjusting the connection. A leak at the bottom of a disposal can have a different cause from a loose drain joint, so use our guide on how to fix a leaking garbage disposal to narrow it down.
What should you do if the replacement does not fit?
Stop if the mount, outlet or wiring does not match instead of forcing parts together. Confirm the model’s compatibility and identify the mismatch before buying adapters or changing the plumbing.
A mount mismatch may require a compatible mounting assembly. A drain mismatch may need a different elbow or pipe arrangement, while a corded versus hardwired mismatch can require electrical work.
If the disposal hums, trips the breaker or fails to start after installation, switch it off and check the manual’s troubleshooting steps. Do not put your hand inside the disposal; see why a garbage disposal may not be working for next steps.
How do you choose the right replacement?
Choose a disposal that fits your mounting hardware, cabinet space, drain layout and electrical connection. Then compare capacity and features with your household’s everyday use.
The Badger 5 is a 1/2 HP option with a power cord and a compact design. To compare power levels before choosing, read what HP garbage disposal you need at home.
Replace a garbage disposal yourself only when you can safely handle its mounting, drain and power connections. If the old unit’s mount is compatible and the plumbing is sound, the job may be a straightforward swap; if the fit or wiring is uncertain, bring in a qualified professional before reconnecting power.
Frequently asked questions
Can I replace a garbage disposal myself?
You may be able to replace a disposal yourself if you can safely shut off its power, support and remove the old unit, and make the drain and electrical connections correctly. Follow the replacement unit’s instructions.
If you find unfamiliar wiring, a damaged outlet or a mounting assembly you cannot secure, stop and call a qualified professional.
Do garbage disposals fit every sink?
No. Check that the replacement can connect to your sink’s mounting assembly and that there is room for its body, drain outlet and plumbing.
Compare the new unit’s instructions and dimensions with the old setup before buying; a different mount or cabinet layout may require extra parts or professional help.
Should I replace the drain pipes with the disposal?
Replace drain parts only when they are damaged, incompatible with the new outlet or leaking. Reuse sound, compatible piping and keep the connections aligned without forcing them.
A disposal installation kit can help when several drain components need replacement, but check the included parts against your under-sink layout.
How do I check for leaks after replacing a disposal?
Restore power only after the electrical work is complete and the area is dry. Run water into the sink and check the sink flange, drain elbow and pipe joints for drips, then run the disposal briefly with water flowing.
If a joint leaks, switch off power and correct the connection before using it again.